*This post may contain affiliate links. Please read the full disclosure here.
*This post may contain affiliate links to products I use and trust. This means if you make a purchase using my links I may receive a small commission at no extra cost to you.

If you are a beginning blogger, I have some great Pinterest starter information towards the end of this post that might help you. Also, check out my viral post on learning to use Pinterest as a new blogger.
Now, on to my 9 takeaway tips from the latest June 2018 update.
What doesn’t really matter:
1. How much content to pin on Pinterest?
This question used to bother me ALOT. Some say pin 70% others content and 30% our content, while others say 20% our content 80% other content, and I used to do 50-50 sometimes. Well, guess what?
This doesn’t matter! Pinterest has said this doesn’t matter.
Pin relevant content. Pin regularly. And pin with QUALITY!
This is all that matters. Even if you are pinning only 20 pins a day, let it be relevant to your Pinterest boards.
Quality content matter, not quantity. And remember to spread out your pins throughout the week, and not suddenly hop on to Pinterest and pin 50 in one go! I do 30 pins a day and I schedule them out using tailwind and this has grown my blog immensely.
Here are some figures from using Tailwind,
Follower count – 3,805 followers ORGANICALLY in 6 months blogging
Pinterest views -620,000 monthly views
Blog traffic – 32,000 pageviews in my 6th-month blogging.
And my this has been through a combination of using Tailwind and Pinterest.
2. Board covers not so important.
Its ok to create board covers if it helps with your branding and helps you stay organized. But in terms of keywords and SEO – it’s not so relevant. I haven’t placed any board cover and it seems to be doing well for me.
3. Don’t worry about deleting old pins.
If you don’t like the look of one of your old pins or if you have too many irrelevant pins that you want to start deleting- don’t waste your time. Instead, start creating new pin images for those old blog posts.
Besides old pins might take off months later and bring you traffic. So I would recommend not deleting any. Just move forward and create new and better performing pins.
Now on to what counts…
What really matters:
1. What size pin images to create?
They recommend using an image size ratio of 2:3. Now I hate to do the math- ha, so I’m going with there recommended sizing of 600 x 900. If you want slightly longer pins 600 x 1200 is good, but nothing more than that as it will cut your image in the Pinterest feed.
2. When to pin?
It was previously stated that Pinterest counts the first 5 pins after midnight UTC as a priority.
This DOESN’T matter any more.
What matters is that you are pinning at the right time when your followers are the most active.
Let me give you an example. I live in the UK and my followers are the most active around 2-4am.
How do I know when my followers are active? Tailwind. Yes, tailwind has a smart scheduler that shows you a list of time slots when your followers are most active called the “smart scheduler”. So engagement is higher and pins get seen more. You can read more about how I use tailwinds smart scheduler here.
Using tailwind has increased my re-pin rate and also increased my click-throughs. I have grown my 3-month-old blog from 0-670,000 monthly views on Pinterest.
Update: Pinterest has officially announced they do not approve the use of scheduling tools like boardbooster. Tailwind is Pinterest approved, so you are in safe hands.
3. Create new fresh content.
Whether its new pins to old blog posts or, new pins to new blog posts – Pinterest loves this and will distribute your content more. I know it’s not possible to create new blog posts every day. Instead, create new pinnable images for those old blog posts and share it on Pinterest.
For every blog post I publish, I create at least 3 pin images. I don’t upload all the three images in one go when I publish a blog post. Instead, one pin goes out when I first publish a post and then I upload the next image a few weeks later and then the third. There were times I even made a fourth image. Well, I enjoy creating them!
4. Pin new pins to the most relevant boards first.
Ok, you create a new blog post and you have a pin image ready to share on Pinterest. What do you do?
I use to quickly pin it to my “own blog board – one fine wallet” with only my posts on it.
This might not be such a good idea anymore.
Here is what you do instead.
For example, you just published a new blog post on a “vegan pasta salad recipe”. Use the pin image you created to FIRST pin it to a Pinterest board you have on “vegan recipes” or “pasta recipes” or “salad recipes” and later pin it to your own blog board. Why? Because the minute you pin your “vegan pasta salad recipe” image to a “vegan recipe” board Pinterest understands its a vegan recipe. So when someone searches for vegan recipes, chances are higher that your pin image might show up in their search results.
BONUS TIP: Even when you are sharing your pins, make you’re you share it to the relevant boards or group boards, and not a “share all your pins” group boards. With group boards that say share all your pins, people sharing your content will be pinning your pins to wrong boards and this will CONFUSE PINTEREST to understand what your pin is all about. I am a part of only one group board where you can share all your pins. Try and limit yourself to these group boards if possible.
5. Manual or scheduled pinning?
The last tip and my favorite! It DOESN’T matter if you pin manually or pin with a scheduler!
What matters is that you pin consistently.
I used to pin manually because a lot of bloggers recommend manual pinning to be more effective. But I found it hard to keep up. I know Pinterest wants us to be consistent, but there are days I forget to pin or neglect to pin on weekends- I have kids you see -ha! Now that I use tailwind, I have never looked back. I can schedule out pins for a month and concentrate on creating blog content.
6. Keywords
The last and most important part is keywords. Even if you have the prettiest pin image, have thousands and group boards with huge followings – you are not going anywhere with traffic if you are not keywording right. You need to place keywords in your profile, board descriptions, and your pin description. Try and let your keywords flow with your sentence and not stuff a sentence with keywords.
Here’s a little example,
Pin description the wrong way – Homemade vegan pasta. Vegan pasta salad. Quick and easy. Vegan recipe. Quick dinners. Lunchbox ideas.
Pin description the correct way– How to create a homemade vegan pasta salad, that is quick and easy that your family will enjoy. This vegan recipe is great for quick dinners and a fantastic lunchbox idea.
Can you see how the second one makes more sense to the reader? Write as you would for people and not PURELY for SEO.
NOW…
Here’s the part for new bloggers:
I know Pinterest might sound overwhelming to you. I was once there and almost gave up learning to use this platform. But now it brings me the most amount of traffic and I’m so glad that I motivated myself to learn it. My friend Megan Johnson has an incredible ebook called Pinterest Ninja. I know you’re thinking “not another ebook!”. But this one is different from the rest. It has a step-by-step ebook and over 2 hours of video tutorials that easily explains how to use Pinterest and shows you potential mistakes you might be making on Pinterest. Megan regularly updates this ebook as and when Pinterest changes its algorithm (You get the updated version for free!- isn’t she incredible).
Her ebook combined with Tailwind scheduling got me over 11,000 pageviews in my 2nd month on a new blog.
And…
Take a look at my Pinterest stats here from 0 – 720,000 monthly Pinterest views in my 3 months blogging!
Yes, Pinterest makes it happen. Blog traffic, loyal blog followers and more. Take your time learning to use this platform and grow your blog.
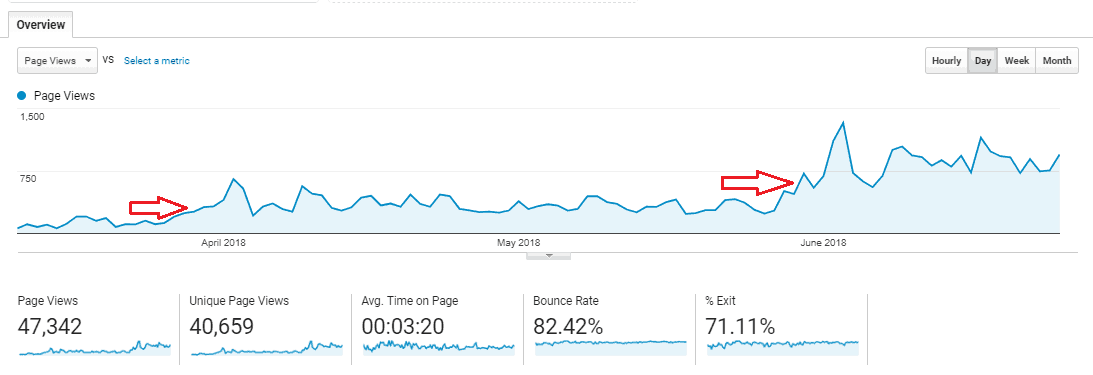
Update: After 5 months of starting this blog, I now average around 1,000 views a day.
If you look at the image below, the first spike in traffic is after I started using tailwind and the second boost in traffic was after I started working on heavily on my Pinterest strategy.
If you have any questions, I’ll be happy to answer them in the comments below or email me at [email protected]


