*This post may contain affiliate links. Please read the full disclosure here.
*Affiliate disclosure- This post contains affiliate links to products that I trust and use. This means that I may receive a small commission if you make a purchase using any of my links below.
Opening an online store is a great passive income idea to make money. But with the increasing number of stores opening every year, the competition gets higher.
So the big question is, how do you stand out?
PINTEREST.
Yes! I love Pinterest for being such a visual treat for buyers. Most of the Pinterest users are ready to make a purchase if they find something that interests them. And since this is a worldwide platform, we are talking potential buyers available around the clock, which averages around 200 million users EVERY MONTH!
To be successful, you need to tick all the right boxes for loyal and returning customers.
If you own an e-commerce store, I am going to show you how to increase sales and promote your website using Pinterest, and do it all on autopilot!
But first, you need to establish some Pinterest basics.
How do you create a strong Pinterest foundation?
1. Business account and rich pins
First thing is to sign up for a business account. Its free and would only take a few minutes to sign up.
Once that’s done. You will need to get rich pins enabled and verify your site with Pinterest. You will need to choose “product pins” under the rich pins category. Product pins not only make your site professional, but they also add the following to your pins,
- the price
- shows the status of your stock, and
- includes the product description alongside your pin images
It pulls all this information from your website, once rich pins are set up.
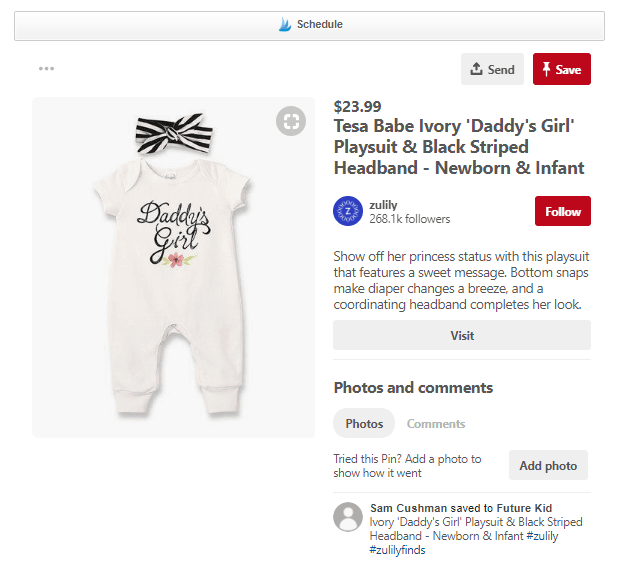
This image below is from a Zulily product that shows the price, product description and a few relevant hashtags. Neat, isn’t it?
2. Create a branded Profile
This is in the settings of your Pinterest account. Let’s head straight to mine and I’ll show you (although mine is a blog, you will need to fill out something similar).
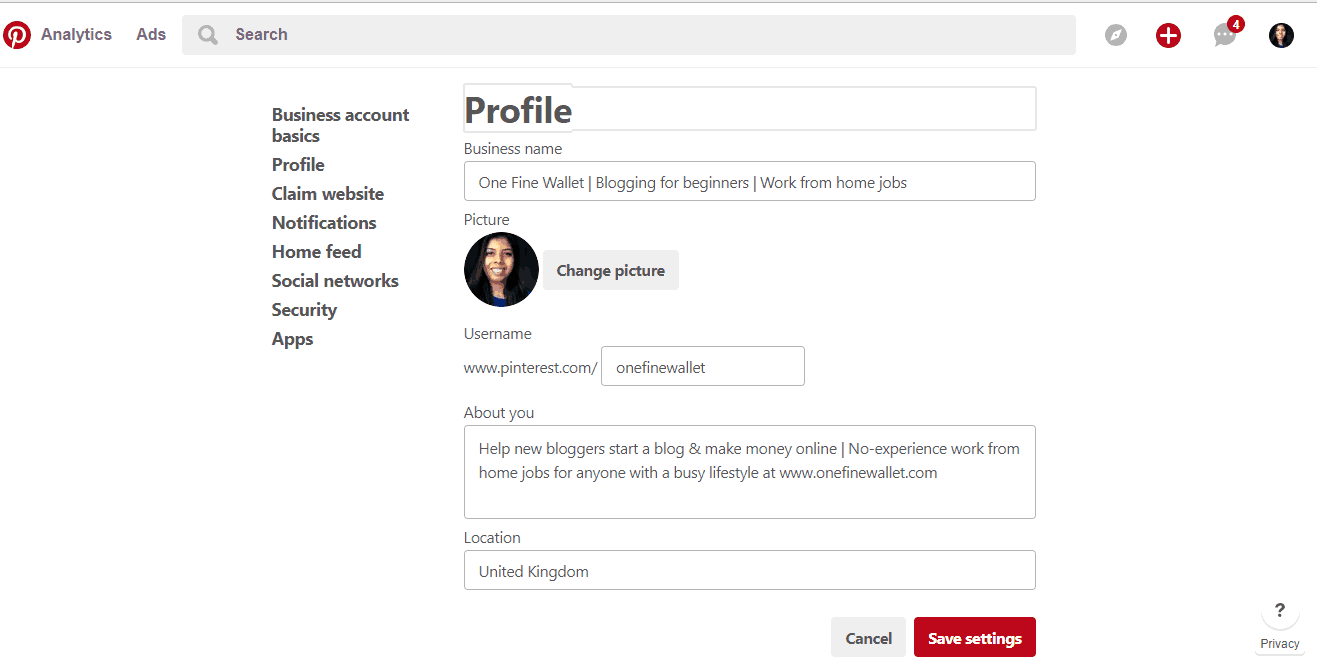
This is in your profile section of the settings tab.
1. Fill in your business name and also include keywords to describe your business. My business name is One Fine Wallet. My Keywords are- “blogging for beginners” and “work from home jobs”.
Depending on your business your keywords might be “summer wedding dresses” or “healthy vegan snacks”. It’s usually words that describe the products you sell on your site or something closely related.
2. For the image, I used my own photo, but you would need to use your company’s logo or the type of branding you go by.
Note- If you are wondering what are keywords – these are nothing but words customers might use to search a product on Pinterest. So say I am a customer looking to buy a lace wedding dress. I would type in, “lace wedding dress” in the search bar. Think like a customer and use them as keywords when you describe your own products.
Here’s a helpful tip to find the most popular keywords:
In the search box type in a product that you sell on your site. As you type along you will see a drop-down of “associated search options”. Using some of these words to describe your product will help you rank high. See how “wedding dresses lace” automatically shows when I type wedding dress? This means this particular product seems to be popular with Pinterest users.
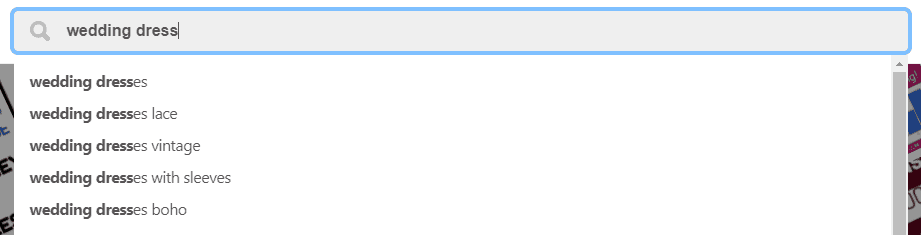
Using popular keywords increases your chances of being found on Pinterest.
3. Social share buttons
You will need to have the social share buttons enabled on your site. This makes it easy for customers who have loved your products, to share it with others on Pinterest. Make your products easy to share, because if they are not ready to buy it just yet, they can “save it” to their own Pinterest account and decide on it later. Doing this will help you from losing a potential customer.
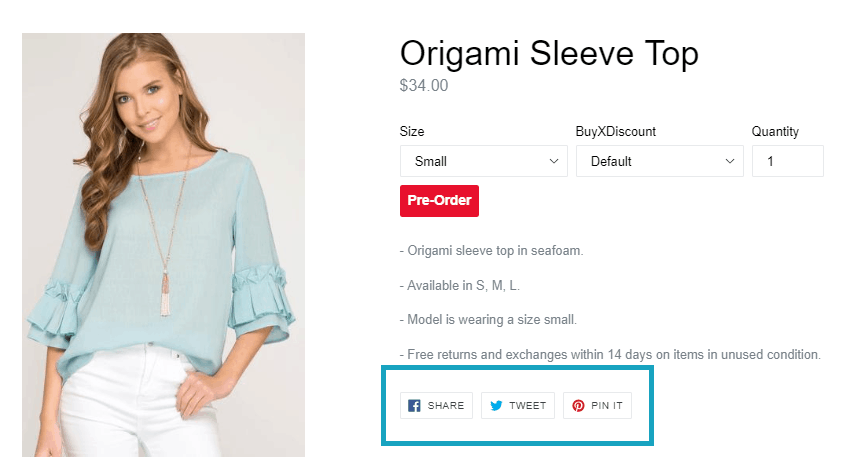
This image above shows how this online store, has placed social share buttons at the bottom of each of their products on their e-commerce site, how handy is that?
4. Optimise Pinterest
As previously mentioned you need to have a Pinterest profile that is well keyworded. But that’s not all, you also need to have your product pin description well keyworded.
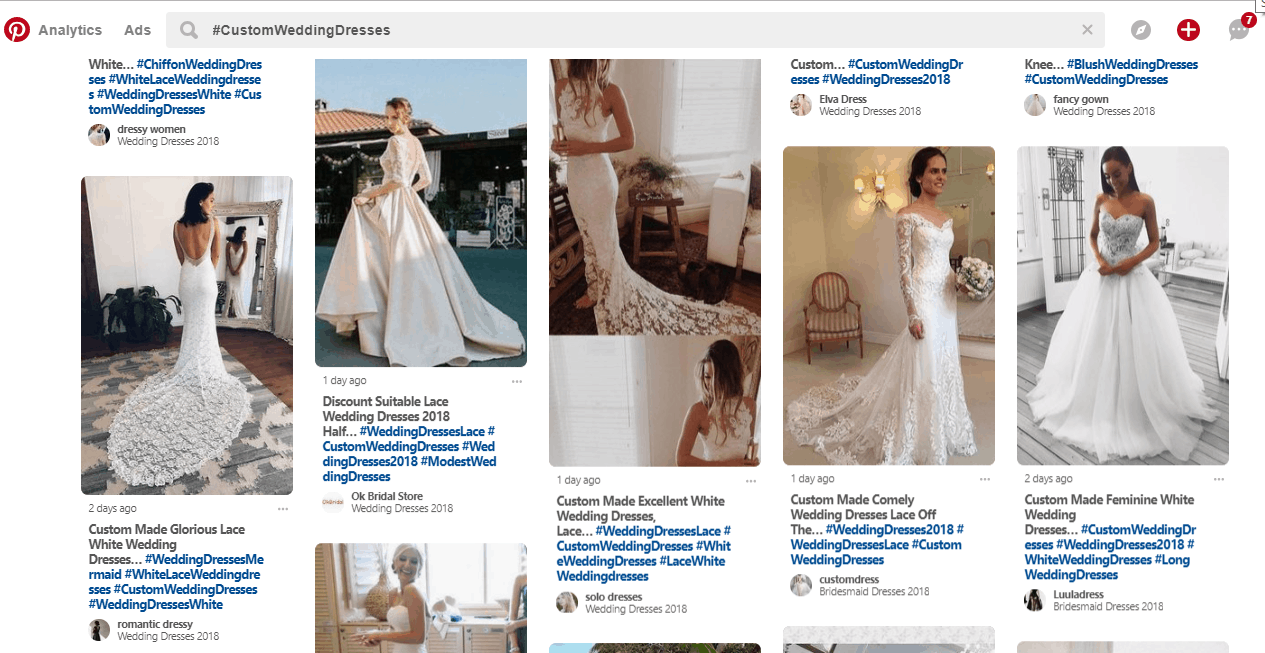
Hashtags are now quite popular on Pinterest. Look at the number of hashtags being used in the product pins above. Try and make use of at least 5 relevant hashtags for each of your pin images.
5. Follow image dimensions
As per the new Pinterest update, images that are sized 600 x 900 px do well in the Pinterest feed. What that means is if your image is too long it might get cut in the smart feed, and if it’s too short, it might look too small as compared to the other images that show up in the smart feed.
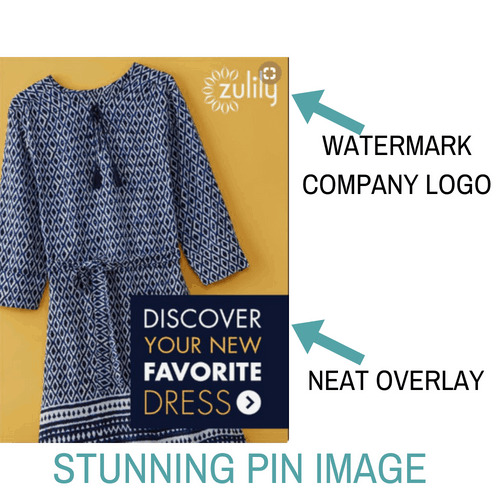
6. Let the image be your hero
It’s best to limit the amount of writing you do on your image (if you decide to write a title on it). Let your image do the talking. I am a personal finance blogger and when I create pin images my writing overshadows my image. But it’s the opposite if you are promoting a product. Let the product sell itself!
This below is an example of how you could neatly create a Pinterest image using a title without interfering with the image of the product. Zulily has created a very professional looking product pin here. Picmonkey is a great image editing tool that can help you create lovely pins like this in no time. An alternative to Picmonkey is, Canva and a new program called design wizard that is cost effective as compared to the rest of the options.
Bonus tips:
If you need inspiration, take a look at the trending pins section on Pinterest and see why those pins are popular, get inspired and use that to create some stunning visuals.
Promote seasonal products, they are sure to perform better. Get your Christmas, new year or easter products out on Pinterest a few weeks in advance and start promoting them. This way your pins can pick up momentum. I would recommend promoting your seasonal pins at least a month in advance.
Still with me? Great!
That’s your Pinterest basics sorted!
Now its time
to start promoting your products on AUTOPILOT
and get your business in front of the BIG BUYERS!
How?
Tailwind.
Tailwind – Pinterest combination is my favorite and I cant tell you how much good it’s done to my blog!
Tailwind is a Pinterest approved Smart scheduler that automates the pinning for you.
If that made no sense. Let me explain.
Say, you were to be pinning manually on Pinterest and promoting products from your e-commerce store, you would need to be active on Pinterest all day, every day, right?
The reason I say this is because Pinterest rewards consistency and being an active pinner. If you are pinning regularly, Pinterest will start showing your products in people’s search results.
But staying active on Pinterest daily can be time-consuming. Especially when you have to spread pinning your pins. It’s not ideal to pin all 30 pins (if that’s how much you pin a day) within a one-hour time slot every day. You need to scatter pinning your content throughout the day. And it helps to pin at times when your Pinterest followers are most active.
This is where Tailwind. Can. Save. Your. Business!
And for 2 important reasons,
1. You can schedule all your pins to Tailwind’s queue more than a month in advance and not worry about logging into your Pinterest account every day. Your products get shown to thousands of interested customers and Pinterest will favor you for being active. A win-win situation here!
2 Tailwind has something called a smart scheduler. You would use your Pinterest account when you sign up for Tailwind. So the two accounts get connected. Tailwind then pulls information from your Pinterest followers and board activities and uses it to create something called a “smart schedule”.
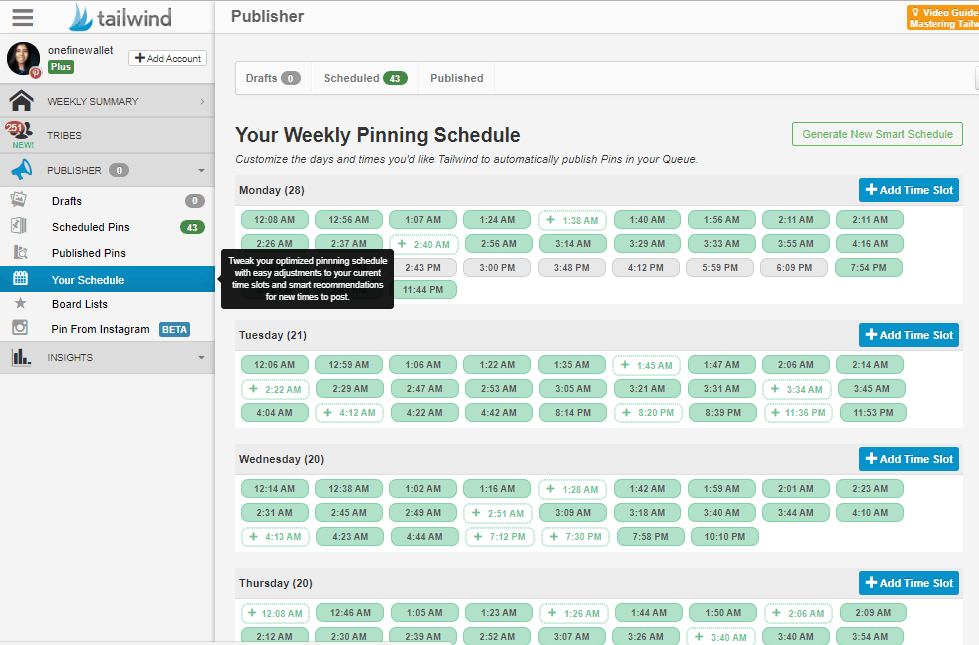
In the Tailwind dashboard, you will see a “Your Schedule” section. This section records the times when your followers are highly active and create time slots in the smart scheduler. View how my smart scheduler looks below.
You can access this by going to Publisher > Your Schedule.
Click on “Generate New Smart Schedule” on the top right corner and decide how many time slots you want in a day. I have chosen to pin 30 a day.
So tailwind has set 30 “time slots” of times when my followers are highly ACTIVE on a daily basis. This is a great feature because now I know I am pinning at the RIGHT TIME!
You can also adjust the time by adding and deleting these time slots to suit you.
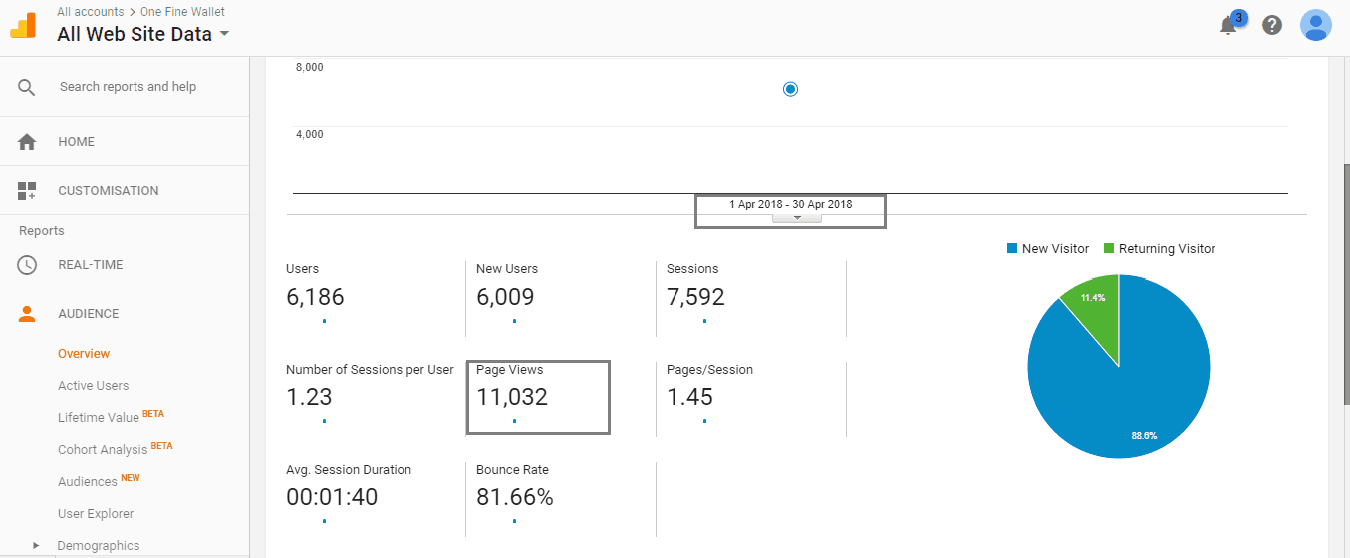
Tailwind has been great for bringing visitors to my blog. These are my own personal results since I started using tailwind.
I began this blog end of February 2018, averaging 40 visitors a day. I wanted to give Tailwind a try at the end of March, and have had no regrets since. I now get over 11,000 page views a month scheduling my pins using the smart scheduler. This is statistics from my google analytics below. Not too bad for a new website that’s only 3 months old:)
Tailwind also publishes the Typical Results of Tailwind for Pinterest Members every year, so you can learn what the average growth rate looks like for their members.
They have a no commitment free trial, and I saw results while still on their FREE plan!
You can sign up for TAILWIND here and schedule your first 100 pins for free.
If you like more information on how to get your business Pinterest ready, here is a more detailed post that might help boost your traffic.
And if you still have any further questions or feedback, I would love to hear from you in the comments below.
Hi Saranya, I enjoy reading your blog so much! I’m new to Pinterest, to be frank. So, you said that you pin 30 pins/day. I heard that you are advised to pin 80/20 (80% own pins, 20% others), right? So if I decided to also pin 30 pins/day, then would I need to have 24 new pins ready every single day, or does it include repinning the old pins? Also, do you recommend repinning the old pins to the same board? Thanks in advance!
Hi Mike! The 80/20 doesn’t apply anymore. That was initially thought to be the best way to go, but now Pinterest recommends pinning fresh content (new pins). Either your own or others. I create at least 2-3 new pins every week and schedule them out to tailwind. I also do re-pin my own content by spreading them out – so I don’t repin the same pin in a 20 day period. Hope this answers your question 🙂